Custom BIAB Setup
We've now completed two brews using our home-made BIAB setup, which is based on the guidance in James Morton's "BREW", but with a few of our own modifications.
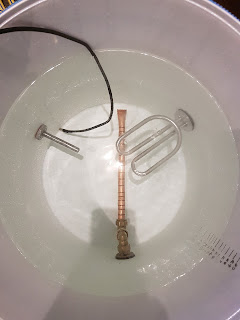
An electric element is screwed into the side. So is the tap. You can also see a thermowell which contains one of temperature probes, the hop filter at the bottom, another temperature probe at the end of a black cable, and level markings done with a sharpie.
We insulated the whole thing using foam camping mats cut to shape. Not only does this stop all the heat leaking out, it also makes the bucket look futuristic.
The tap has a barb fitting which makes it very easy to attach a silicone tubing just by pushing it on (no hose clip).


Temperature readings are displayed on a laptop connected by a serial cable. The chosen temperature can be altered as required, and the heater will be turned on and off automatically.


But it's normal use is for circulating the wort to keep the temperatures even, recirculation through the bag, and sparging.
*Not official.

Some wee hooks in the side of the bucket provide an anchor for the draw string.

The insulation did it's job very well- the temperature dropped by less than half a degree over a one hour mash.
The pump works a treat but could with a way of reducing the flow rate for a slower sparge.
2. Thermowell position. Wasn't sure of the best place to read temperature, this could be too low. However, the second probe allows us to check the temperature distribution.
1. Recirculation/Sparging distributor. Either a plate with holes in it, or a spray arm of some sort.
2. Add fixing for the pump hose to avoid spraying the kitchen in valuable wort.
3. Automatic temperature changes for multi-stage mashes.
4. Mesh cover for the heating element so that we don't have to worry about melting the mash bag at the mash-out.
Basic Setup
We followed the book pretty closely here. We got a Polypropylene bucket from thebrewshop.co.uk which says they can be used as boilers AT YOUR OWN RISK. Well, we like to live dangerously.An electric element is screwed into the side. So is the tap. You can also see a thermowell which contains one of temperature probes, the hop filter at the bottom, another temperature probe at the end of a black cable, and level markings done with a sharpie.
We insulated the whole thing using foam camping mats cut to shape. Not only does this stop all the heat leaking out, it also makes the bucket look futuristic.
The tap has a barb fitting which makes it very easy to attach a silicone tubing just by pushing it on (no hose clip).


Left: Inside the masher boiler- element, thermowell, hop filter and a secondary probe on a cable. Oh and level markings. Right: Masher-Boiler, insulated in shiny camping mats (x2)


Left: Mashing out and recirculating. Mash bag is partially suspended to lift it from the element. Pump circulates water which is distributed over the great. Right: sous vide heater used for heating up sparge water.
Cooler
This is my favourite bit. Not only is this a bad ass heat exchanger, it is also very shiny. Bit of a pig to make but a fraction of the price of one 'off of shelf'.Arduino Control and Monitoring of Temperature
The heating element is controlled by an Arduino-based microcontroller coupled to a 240V relay. Or in other words, science/magic. Two probes continuously read the temperature- one fixed into the side of the bucket, and one on a loose cable, allowing it to be moved around.Temperature readings are displayed on a laptop connected by a serial cable. The chosen temperature can be altered as required, and the heater will be turned on and off automatically.


Left: Arduino-based controller and 240V relay for controlling temperature.
Right: Temperature readings on the laptop. You can enter the desired temperature in here and the controller will automatically turned the heat on and off as required.
Circulation/Sparge Pump
This is officially* the world's smallest and most awesome pump, and only £9 on Amazon. In our first brew it got us out of trouble when the hop filter clogged up and we needed another way of transfering 20 litres of wort into the fermenter.But it's normal use is for circulating the wort to keep the temperatures even, recirculation through the bag, and sparging.
*Not official.

Our little sparge pump. Cute.
Hop Bags
Not having something to contain the hop pellets was nearly a disaster for the first brew. Not making that mistake again, oh no. This is where having a mother who can use a sewing machine really comes in handy.Some wee hooks in the side of the bucket provide an anchor for the draw string.

Hop bags. Thanks Mum.
Air pump and stones
For the first brew we achieved aeration of the wort by spashing and filling from a height. We now have an aquarium air pump kit with air stones. This is much more cooler. But i don't have a photo. Which is less cool.Results
The recipe said to hear the water to 68degC for a 64degC mash. But we found that the temperature dropped by less than 2degC when the malt was added, which meant we were above mash temperature. Noted for the next brew.The insulation did it's job very well- the temperature dropped by less than half a degree over a one hour mash.
The pump works a treat but could with a way of reducing the flow rate for a slower sparge.
Issues
1. The heating element is slightly too high in the bucket. Not a major issue, but restricts the brew bag and doesn't leave much head room for smaller brew sizes.2. Thermowell position. Wasn't sure of the best place to read temperature, this could be too low. However, the second probe allows us to check the temperature distribution.
Future mods
Some things we may or may not do depending on time and cantbebotheredness levels;
1. Recirculation/Sparging distributor. Either a plate with holes in it, or a spray arm of some sort.
2. Add fixing for the pump hose to avoid spraying the kitchen in valuable wort.
3. Automatic temperature changes for multi-stage mashes.
4. Mesh cover for the heating element so that we don't have to worry about melting the mash bag at the mash-out.

Comments
Post a Comment